Java Mockito Common Uses (Mock Static, Mock Private…)

In this project, we will be discussing some mockito common uses:

  1. Mock a method
  2. Mock a private method
  3. Mock a static method
  4. Mock a private static method

Before starting, let’s look at the required dependencies and the Class used for test. Also, the whole project can be downloaded here:  https://github.com/nxhoaf/java-code/tree/master/using-mock

Dependencies:

  <dependencies>
    <dependency>
      <groupId>junit</groupId>
      <artifactId>junit</artifactId>
      <version>${junit.version}</version>
      <scope>test</scope>
    </dependency>

    <dependency>
      <groupId>org.mockito</groupId>
      <artifactId>mockito-core</artifactId>
      <version>${mockito.version}</version>
      <scope>test</scope>
    </dependency>

    <dependency>
      <groupId>org.powermock</groupId>
      <artifactId>powermock-api-mockito</artifactId>
      <version>${powermock.version}</version>
      <scope>test</scope>
    </dependency>

    <dependency>
      <groupId>org.powermock</groupId>
      <artifactId>powermock-module-junit4</artifactId>
      <version>${powermock.version}</version>
      <exclusions>
        <exclusion>
          <groupId>junit</groupId>
          <artifactId>junit</artifactId>
        </exclusion>
        <exclusion>
          <groupId>org.powermock</groupId>
          <artifactId>powermock-core</artifactId>
        </exclusion>
        <exclusion>
          <groupId>org.powermock</groupId>
          <artifactId>powermock-reflect</artifactId>
        </exclusion>
      </exclusions>
      <scope>test</scope>
    </dependency>
  </dependencies>
  

Class to test

public class Validator {
  public int getInteger(String integer) {
    Integer i = new Integer(integer);
    return i;
  }
  public static boolean isValidUrlStatic(String url) {
    boolean isValid = false;
    try {
      new URL(url);
      isValid = true;
    } catch (Exception e) {}
    return isValid;
  }
  public boolean isValidUrl(String url) {
    boolean isValid = false;
    try {
      new URL(url);
      isValid = true;
    } catch (Exception e) {}
    return isValid;
  }
  public static boolean isValidIntegerStatic(String integer) {
    return isValidIntegerPrivateStatic(integer);
  }
  private static boolean isValidIntegerPrivateStatic(String integer) {
    boolean isValid = false;
    try {
      Integer.parseInt(integer);
      isValid = true;
    } catch (Exception e) {}
    return isValid;
  }
  public boolean isValidInteger(String integer) {
    return isValidIntegerPrivate(integer);
  }
  private boolean isValidIntegerPrivate(String integer) {
    boolean isValid = false;
    try {
      Integer.parseInt(integer);
      isValid = true;
    } catch (Exception e) {}
    return isValid;
  }
}

Now, let’s consider the following tests:

1. Mock a method

@RunWith(PowerMockRunner.class)
public class MockTest {
  @Test
  public void isValidUrl() {
    Validator validator = Mockito.mock(Validator.class);
    
    String url = "This is an invalidUrl";
    Mockito.when(validator.isValidUrl(url)).thenReturn(true);
    
    boolean isVaid = validator.isValidUrl(url);
    
    Assert.assertTrue("Should be true", isVaid);
    Mockito.verify(validator, Mockito.timeout(1)).isValidUrl(url);
  }
}

2. Mock a private method

@RunWith(PowerMockRunner.class)
@PrepareForTest({ Validator.class })
public class MockPrivateTest {
  @Test
  public void isValidUrl_WrongUse() throws Exception {
    // False, because we are mocking the whole class, so the real
    // 'isValidInteger' is not
    // getting called
    Validator validator = Mockito.mock(Validator.class);

    String integer = "This is an invali Integer";
    PowerMockito.doReturn(true).when(validator, "isValidIntegerPrivate",
        integer);

    boolean isVaid = validator.isValidInteger(integer);

    Assert.assertTrue("Should be true", isVaid);
    Mockito.verify(validator, Mockito.timeout(1)).isValidUrl(integer);
    PowerMockito.verifyPrivate(validator, Mockito.times(1)).invoke(
        "isValidIntegerPrivate", integer);
  }

  @Test
  public void isValidUrl_CorrectUse() throws Exception {
    // False, because we are mocking the whole class, so the real
    // 'isValidInteger' is not
    // getting called
    // to mock private, PowerMockito must be used. Mockito will not working
    // Validator validator = Mockito.spy(new Validator()); // Not working

    Validator validator = PowerMockito.spy(new Validator());

    String integer = "This is an invali Integer";
    PowerMockito.doReturn(true).when(validator, "isValidIntegerPrivate",
        integer);

    boolean isVaid = validator.isValidInteger(integer);

    Assert.assertTrue("Should be true", isVaid);
    PowerMockito.verifyPrivate(validator, Mockito.times(1)).invoke(
        "isValidIntegerPrivate", integer);
  }
}

3. Mock a static method

@RunWith(PowerMockRunner.class)
@PrepareForTest({ Validator.class })
public class MockStaticTest {
  @Test
  public void testIsValidUrl_First_Solution() {
    PowerMockito.mockStatic(Validator.class);

    String url = "This is not an url";
    PowerMockito.when(Validator.isValidUrlStatic(url)).thenReturn(true);

    boolean result = Validator.isValidUrlStatic(url);
    result = Validator.isValidUrlStatic(url);
    Assert.assertTrue("Should be true", result);

    PowerMockito.verifyStatic(Mockito.times(2));
    Validator.isValidUrlStatic(url);
  }

  @Test
  public void testIsValidUrl_Second_Solution() throws Exception {
    PowerMockito.mockStatic(Validator.class);

    String url = "This is not an url";
    PowerMockito.doReturn(true).when(Validator.class, "isValidUrlStatic",
        url);

    boolean result = Validator.isValidUrlStatic(url);
    Assert.assertTrue("Should be true", result);

    // PowerMockito.verifyStatic(Mockito.times(1));
    PowerMockito.verifyStatic(); // Same as above
    Validator.isValidUrlStatic(url);
  }
}

4. Mock a private static method

@RunWith(PowerMockRunner.class)
@PrepareForTest({ Validator.class })
public class MockPrivateStaticTest {
  @Test
  public void testIsValidInteger_WrongUse() throws Exception {
    // False, because we are mocking the whole class, so the real
    // 'isValidInteger' is not
    // getting called
    PowerMockito.mockStatic(Validator.class);

    String integer = "This is not an url";
    PowerMockito.doReturn(true).when(Validator.class,
        "isValidIntegerPrivateStatic", integer);

    boolean result = Validator.isValidIntegerStatic(integer);
    assertTrue("Should be true", result);
    PowerMockito.verifyPrivate(Validator.class, Mockito.times(1)).invoke(
        "isValidIntegerPrivate", integer);
  }

  @Test
  public void testIsValidInteger_CorrectUse() throws Exception {
    // This is the correct use, we want to mock isValidIntegerPrivate but we
    // still want
    // the real method isValidInteger gets called
    PowerMockito.spy(Validator.class);

    String integer = "This is not an url";
    PowerMockito.doReturn(true).when(Validator.class,
        "isValidIntegerPrivateStatic", integer);

    boolean result = Validator.isValidIntegerStatic(integer);
    Assert.assertTrue("Should be true", result);
    PowerMockito.verifyPrivate(Validator.class, Mockito.times(1)).invoke(
        "isValidIntegerPrivate", integer);
  }
}
Posted in Java, Uncategorized | Leave a comment

Spring MVC: Return a JSON object

In a Spring MVC project, we can directly return a JSON object. This feature is very useful when combined with ajax request from the client side. Here is few simple step to do this:

  • Import JSON dependencies (jackson library) to your project
  • Create Java objects, which will be converted to JSON object
  • Create a simple Spring Controller to handle the request
  • Test it using jetty server.

You can also download the source code here: https://github.com/nxhoaf/spring-mvc-json. Here, I assume that you are already familiar with Maven. If it’s not the case, you can certainly manually insert dependencies in your classpath.

1. JSON dependencies to your pom.xml

        <!-- Enable JSON via Jackson -->
        <dependency>
            <groupId>org.codehaus.jackson</groupId>
            <artifactId>jackson-core-asl</artifactId>
            <version>1.9.10</version>
        </dependency>
        <dependency>
            <groupId>org.codehaus.jackson</groupId>
            <artifactId>jackson-mapper-asl</artifactId>
            <version>1.9.10</version>
        </dependency>

2. Java Object, which will be converted to JSON

// --------------- Person.java ------------------
package com.gmail.nxhoaf;

public class Person {
    private String name;
    private int age;
    
    public Person() {}
    public Person(String name, int age) {
        this.name = name;
        this.age = age;
    }
    public String getName() {
        return name;
    }
    public void setName(String name) {
        this.name = name;
    }
    public int getAge() {
        return age;
    }
    public void setAge(int age) {
        this.age = age;
    }
}

// --------------- Shop.java ------------------
package com.gmail.nxhoaf;
 
 
import java.util.ArrayList;
import java.util.List;
 
public class Shop {
    private String name;
    private List<Person> staffs;
    
    public Shop() {
        staffs = new ArrayList<Person>();
    }
    
    public String getName() {
        return name;
    }
    public void setName(String name) {
        this.name = name;
    }
    public List<Person> getStaffs() {
        return staffs;
    }
    public void setStaffs(List<Person> staffs) {
        this.staffs = staffs;
    }
    public void addStaff(Person staff) {
        staffs.add(staff);
    }
} 

3. Create simple Spring Controller


package com.gmail.nxhoaf;
 
import org.springframework.stereotype.Controller;
import org.springframework.web.bind.annotation.RequestMapping;
import org.springframework.web.bind.annotation.RequestMethod;
import org.springframework.web.bind.annotation.ResponseBody;
 
 
@Controller
@RequestMapping("/json")
public class JSonController {
    @RequestMapping(method = RequestMethod.GET)
    public @ResponseBody Shop getShopInJSON() {
        Shop shop = new Shop();
        shop.setName("myShop");
        
        Person p1 = new Person("Alice", 20);
        Person p2 = new Person("Bob", 30);
        shop.addStaff(p1);
        shop.addStaff(p2);
 
        return shop;
    }
} 

That is! Now, we test it with our jetty server. You might want to see here Spring MVC: Creating a Project from Scratch using Maven to see how to run a Spring MVC project with jetty

mvn clean install
mvn jetty:run

Then, open http://localhost:8080/spring-mvc-json/json, you should see the following result:

json-result


Posted in Java, Spring | Leave a comment

Spring MVC: Creating a Project from Scratch using Maven

If you don’t want to use Spring STS to create your Spring MVC project, you can, of course, create it from the scratch. And here is what we will need to do:

  • Create a java web project using maven
  • Test it using Jetty
  • Transform it to a Spring MVC project

For the source code, you can download it here: https://github.com/nxhoaf/spring-mvc-from-scratch. And now, let’s start:

1. Create a java j2ee project using maven:

mvn archetype:generate
     -DgroupId=com.gmail.nxhoaf
     -DartifactId=spring-mvc-from-scratch
     -DarchetypeArtifactId=maven-archetype-webapp

When asked for the version, just enter to choose the default one (1.0-SNAPSHOT).  After that, we should have a project structure like below:

spring-mvc-from-scratch
    ├── pom.xml
    └── src
        └── main
            ├── resources
            └── webapp
                ├── index.jsp
                └── WEB-INF
                    └── web.xml

Next, we will convert it to eclipse project and import it to your eclipse ide. This step is optional, if you don’t want to use eclipse, feel free to go ahead.

mvn eclipse:eclipse

2. Test it using jetty server

– Add some configurations:

        <plugins>
            <!-- To enable jetty -->
            <plugin>
                <groupId>org.mortbay.jetty</groupId>
                <artifactId>maven-jetty-plugin</artifactId>
            </plugin>
        </plugins>

        <!-- Servlet and JSP -->
        <dependency>
            <groupId>javax.servlet</groupId>
            <artifactId>servlet-api</artifactId>
            <version>2.4</version>
            <!-- <scope>provided</scope> -->
        </dependency>
        <dependency>
            <groupId>javax.servlet.jsp</groupId>
            <artifactId>jsp-api</artifactId>
            <version>2.0</version>
            <!-- <scope>provided</scope> -->
        </dependency>

run it:

mvn clean install
mvn jetty:run

Then, go to http://localhost:8080/spring-mvc-from-scratch/, you should she the hello world message.

3. Transform the project to a Spring MVC project

– Add the FrontController and the listener in the xml file:

    <listener>
        <listener-class>org.springframework.web.context.ContextLoaderListener</listener-class>
    </listener>

    <!-- Define Front Controller for Spring -->
    <servlet>
        <servlet-name>appServlet</servlet-name>
        <servlet-class>org.springframework.web.servlet.DispatcherServlet</servlet-class>
        <init-param>
            <param-name>contextConfigLocation</param-name>
            <param-value>/WEB-INF/masterApplicationContext.xml</param-value>
        </init-param>
        <load-on-startup>1</load-on-startup>
    </servlet>

    <servlet-mapping>
        <servlet-name>appServlet</servlet-name>
        <url-pattern>/</url-pattern>
    </servlet-mapping>
</web-app>

– Then, create an applicationContext.xml in WEB-INF with the following content:

<?xml version="1.0" encoding="UTF-8"?>
<beans xmlns="http://www.springframework.org/schema/beans"
        xmlns:context="http://www.springframework.org/schema/context"
        xmlns:mvc="http://www.springframework.org/schema/mvc"
        xmlns:xsi="http://www.w3.org/2001/XMLSchema-instance"
        xsi:schemaLocation="http://www.springframework.org/schema/beans
                http://www.springframework.org/schema/beans/spring-beans-3.0.xsd
                http://www.springframework.org/schema/context
                http://www.springframework.org/schema/context/spring-context-3.0.xsd
                http://www.springframework.org/schema/mvc
                http://www.springframework.org/schema/mvc/spring-mvc-3.0.xsd">
    <!-- Handle annotation driven request mapping -->
    <mvc:annotation-driven />

    <context:component-scan base-package="com.gmail.nxhoaf" />
    
       <!-- Resolves views selected for rendering by @Controllers to .jsp resources in the /WEB-INF/views directory -->
    <bean class="org.springframework.web.servlet.view.InternalResourceViewResolver">
        <property name="prefix" value="/WEB-INF/views/" />
        <property name="suffix" value=".jsp" />
    </bean>
</beans>


– Next, import the following Spring MVC dependencies to your pom.xml

    <!-- Define some properties -->
    <properties>
        <spring.version>3.0.2.RELEASE</spring.version>
    </properties>

        <!-- Spring -->
        <dependency>
            <groupId>org.springframework</groupId>
            <artifactId>spring-aop</artifactId>
            <version>${spring.version}</version>
        </dependency>
        <dependency>
            <groupId>org.springframework</groupId>
            <artifactId>spring-context-support</artifactId>
            <version>${spring.version}</version>
        </dependency>
        <dependency>
            <groupId>org.springframework</groupId>
            <artifactId>spring-beans</artifactId>
            <version>${spring.version}</version>
        </dependency>
        <dependency>
            <groupId>org.springframework</groupId>
            <artifactId>spring-context</artifactId>
            <version>${spring.version}</version>
        </dependency>
        <dependency>
            <groupId>org.springframework</groupId>
            <artifactId>spring-core</artifactId>
            <version>${spring.version}</version>
        </dependency>
        <dependency>
            <groupId>org.springframework</groupId>
            <artifactId>spring-web</artifactId>
            <version>${spring.version}</version>
        </dependency>
        <dependency>
            <groupId>org.springframework</groupId>
            <artifactId>spring-webmvc</artifactId>
            <version>${spring.version}</version>
        </dependency>

– Then, we create the first Spring Hello World Controller:

package com.gmail.nxhoaf;

import java.util.Date;
import java.util.Locale;

import org.springframework.stereotype.Controller;
import org.springframework.ui.Model;
import org.springframework.web.bind.annotation.RequestMapping;
import org.springframework.web.bind.annotation.RequestMethod;

@Controller
public class HelloWorldController {
    @RequestMapping(value = "/", method = RequestMethod.GET)
    public String home(Locale locale, Model model) {
        Date date = new Date();
        model.addAttribute("serverTime", date );
        return "helloWorld";
    }
}

And finally, create the helloWorld.jsp in WEB-INF/views

<%@ page isELIgnored="false" %>

<html>
<body>
<h2>Hello World at: ${serverTime}</h2>
</body>
</html>

Now, you can test your work at: http://localhost:8080/spring-mvc-from-scratch/


Posted in Java | 1 Comment

Easy to remember: Composition vs Aggregation

As a rule of thumb:

In composition (Person, Heart, Hand), aggregated objects (Heart, Hand) will be destroyed as soon as Person is destroyed.

In aggregation (City, Tree, Car) aggregated objects (Tree, Car) will NOT be destroyed when City is destroyed.

The bottom line is, composition stresses on mutual existence, and in aggregation, this property is NOT required. Capture

class Person {
    private Heart heart;
    private List<Hand> hands;
}

class City {
    private List<Tree> trees;
    private List<Car> cars
}
Posted in Java | Tagged , | Leave a comment

Import an existing Maven-based project to eclipse

  1. Create a new Maven Project (if you already have one, just skip this step)
$ mvn archetype:generate 
    -DgroupId=package.name.ProjectName
    -DartifactId=ProjectName 
    -Dpackage=package.name 
    -Dversion=1.0-SNAPSHOT

When asked, just keep the default configuration. It means that we’re going to use maven-archetype-quickstart archetype

  1. Convert it to Eclipse Project
$ cd ProjectName
$ mvn eclipse:eclipse
  1. Add M2_REPO to Eclipse: In Eclipse, Select Window > Preferences > Java > Build Path > Classpath Variables. Then, Click on the New… button > defined a new M2_REPO variable (if it hasn’t existed yet) and point it to your local Maven repositoryRepo
  2. Import it to Eclipse.
Posted in Java | Tagged , | Leave a comment

Simple Text To Speech in Java based on Google Translate API

Google Translate is one of the most powerful Google Services, it helps us to translate text from one language to another language. The good thing is that it also pronounces the translating (or translated) text. You can try it yourself by using this link, for example:

https://translate.google.com/translate_tts?tl=en&q=Hello

Based on this idea, we’ll build a simple Java program which takes two input variables: language and text and outputs a mp3 file of text in language.

The program is very straightforward and self-explained, it just takes 86 lines of codes and can be found here:

package com.nxhoaf;

import java.io.BufferedInputStream;
import java.io.BufferedOutputStream;
import java.io.ByteArrayOutputStream;
import java.io.File;
import java.io.FileOutputStream;
import java.net.HttpURLConnection;
import java.net.URL;
import java.net.URLEncoder;

public class SimpleTextToSpeech {
    private static final String TEXT_TO_SPEECH_SERVICE = 
            "http://translate.google.com/translate_tts";
    private static final String USER_AGENT =  
            "Mozilla/5.0 (Windows NT 6.1; WOW64; rv:11.0) " +
            "Gecko/20100101 Firefox/11.0";

    public static void main(String[] args) throws Exception {
        if (args.length != 2) {
            System.out.println("Usage: SimpleTextToSpeech <language> <text> " +
                    "where: ");
            System.out.println();
            System.out.println("- Language: all languages accepted by " +
                    "google translate, in this example, we'll use fr, en");
            System.out.println("- Text : If text is more than one word, " +
                    "then is must be put inside double quote, for example:");
            System.out.println("\tjava SimpleTextToSpeech en Hello");
            System.out.println("\tjava SimpleTextToSpeech en \"Hello World\"");
            System.exit(1);
        }
        Language language = Language.valueOf(args[0].toUpperCase());
        String text = args[1];
        text = URLEncoder.encode(text, "utf-8");
        new SimpleTextToSpeech().go(language, text);
    }

    public void go(Language language, String text) throws Exception {
        // Create url based on input params
        String strUrl = TEXT_TO_SPEECH_SERVICE + "?" + 
                "tl=" + language + "&q=" + text;
        URL url = new URL(strUrl);

        // Etablish connection
        HttpURLConnection connection = (HttpURLConnection) url.openConnection();
        // Get method
        connection.setRequestMethod("GET");
        // Set User-Agent to "mimic" the behavior of a web browser. In this 
        // example, I used my browser's info
        connection.addRequestProperty("User-Agent", USER_AGENT);
        connection.connect();

        // Get content
        BufferedInputStream bufIn = 
                new BufferedInputStream(connection.getInputStream());
        byte[] buffer = new byte[1024];
        int n;
        ByteArrayOutputStream bufOut = new ByteArrayOutputStream();
        while ((n = bufIn.read(buffer)) > 0) {
            bufOut.write(buffer, 0, n);
        }

        // Done, save data
        File output = new File("output.mp3");
        BufferedOutputStream out = 
                new BufferedOutputStream(new FileOutputStream(output));
        out.write(bufOut.toByteArray());
        out.flush();
        out.close();
        System.out.println("Done");
    }

    public enum Language {
        FR("french"),
        EN("english");

        private final String language;
        private Language(String language) {
            this.language = language;
        }

        public String getFullName() {
            return language;
        }
    }
}

Note that here, I used only English and French as input languages. Of course, it isn’t difficult to add another languages to the program (In fact, you can add as many languages as you want, as soon as it’s supported by Google Translate).

Posted in Java | Tagged | 2 Comments

Hadoop Mapreduce word count using eclipse

This article describes how to create a word count example using Eclipse.

  1. Requirement
  • Eclipse Juno 32bit
  • JDK 6.xx
  • Latest Hadoop version (At the time of this writing, 1.0.4 is the lastest stable version)
  • Linux Ubuntu 12.04 (although we can use Window, Linux seems to be better)
  1. Setup paths

Before using Hadoop MapReduce, one must set up some environment variables:

  • JAVA_HOME
  • HADOOP_HOME (optional for this tutorial)

If you don’t know how to set up these variables, just googling a little bit 🙂

3. Import Hadoop Library

The next step is to import Hadoop Library. Note that for simplicity, we won’t use Maven here. After downloading hadoop, go to the HADOOP_HOME, copy these following files into our lib folder:

  • All jar files in HADOOP_HOME (for me, it means it means all jar file in hadoop-1.0.4)
  • All jar files in lib folder (for me, it’s all jar file in hadoop-1.0.4/lib).

After that, don’t forget to add them to your classpath for later use. When all finished, you should end up with something like this:

Capture

4. The Word count example

We’re going to create a simple word count example. Given a text file, one should be able to count all occurrences of each word in it. In general, the program consists of three classes:

  • WordCountMapper.java the mapper.
  • WordCountReducer.java the reducer.
  • WordCount.java the driver. Some configurations (input type, output type, job…) are done here.

WordCountMapper.java

The WordCountMapper.java contains the map() function: it just takes the input file line-by-line (in the value variable). For each line, it emits the key value (word, 1). Where word is a specific word found in that line. For example, given this line:

“This is a line”

Then the map() function will output four key-value pairs: {this, 1}, {is, 1}, {a, 1}, {line, 1}

Here is the source code of WordCountMapper.java:

package fr.telecomParistech.mapreduce.wordcount;

import java.io.IOException;

import org.apache.hadoop.io.IntWritable;
import org.apache.hadoop.io.LongWritable;
import org.apache.hadoop.io.Text;
import org.apache.hadoop.mapreduce.Mapper;

public class WordCountMapper 
        extends Mapper<LongWritable, Text, Text, IntWritable>{
    private static final IntWritable one = new IntWritable(1);
    private Text word = new Text();

    @Override
    protected void map(LongWritable key, Text value, Context context)
            throws IOException, InterruptedException {
        String line = value.toString();
        String[] words = line.split("");
        for (String w : words) {
            word.set(w);
            context.write(word, one);
        }
    }
}

WordCountReducer.java

The reduce() function in WordCountReducer is even simpler. All we have to do is to loop over values of the same key and sum it up. The source code is straightforward and self-explained:

package fr.telecomParistech.mapreduce.wordcount;

import java.io.IOException;
import java.util.Iterator;

import org.apache.hadoop.io.IntWritable;
import org.apache.hadoop.io.Text;
import org.apache.hadoop.mapreduce.Reducer;

public class WordCountReducer 
        extends Reducer<Text, IntWritable, Text, IntWritable>{

    @Override
    protected void reduce(Text key, Iterable<IntWritable> values, 
            Context context)
            throws IOException, InterruptedException {
        int sum = 0;
        Iterator<IntWritable> itr = values.iterator();
        while (itr.hasNext()) {
            sum += itr.next().get();
        }

        context.write(key, new IntWritable(sum));
    }
}

WordCount.java

WordCount.java is responsible for the configuration, setup…. MapReduce job. It contains several configuration information of the system:

package fr.telecomParistech.mapreduce.wordcount;

import org.apache.hadoop.fs.Path;
import org.apache.hadoop.io.IntWritable;
import org.apache.hadoop.io.Text;
import org.apache.hadoop.mapreduce.Job;
import org.apache.hadoop.mapreduce.lib.input.FileInputFormat;
import org.apache.hadoop.mapreduce.lib.output.FileOutputFormat;

public class WordCount {
    public static void main(String[] args) throws Exception {        

        String input = "test.txt";
        String output = "out";

        // Create a new job
        Job job = new Job();

        // Set job name to locate it in the distributed environment
        job.setJarByClass(WordCount.class);
        job.setJobName("Word Count");

        // Set input and output Path, note that we use the default input format
        // which is TextInputFormat (each record is a line of input)
        FileInputFormat.addInputPath(job, new Path(input));
        FileOutputFormat.setOutputPath(job, new Path(output));

        // Set Mapper and Reducer class
        job.setMapperClass(WordCountMapper.class);
        job.setReducerClass(WordCountReducer.class);

        // Set Output key and value
        job.setOutputKeyClass(Text.class);
        job.setOutputValueClass(IntWritable.class);

        System.exit(job.waitForCompletion(true) ? 0 : 1);
    }
}

Note that here, we don’t explicitly set input type for the mapper function but use the default one. Infact, the default input type of Hadoop framework is TextInputFormat in which each record is a line of input. The key, a LongWritable, is the offset within the file of the beginning of the line. The value, a Text, is the content of the line. So, our input file, whose content is the following text:

this is line 1
this is line 2
......
this is line n

is divided into these records. Note that the keys are NOT line numbers.

0               , this is line 1
offset_of_line_2, this is line 2
......
offset_of_line_n, this is line n

Now, put a paragraph into “text.txt”, and run the program, you should have the result in “out” folder…

Posted in Java | Tagged , | 4 Comments

Public, protected, default and private in Java

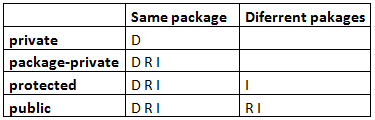
Here is some simple rules to memorize these access modifiers :

  • private: class scope.
  • default (or package-private): package scope
  • protected: package scope + child (like pakage, but we can subclass it from different pakages). The protected modifier always keeps the “parent-child” relationship.
  • public : everywhere.

As a result, if we divide access right into three rights:

  • (D)irect (invoke from a method inside the same class)
  • (R)eference (invoke a method using a reference to the class, or via “dot” syntax)
  • (I)nheritance (via subclassing)

then we have this simple table:

enter image description here

Posted in Java | Tagged | Leave a comment

Get URL Base / Hostname of the servlet

Here is a simple method for getting hostname of the current servlet:

public String getUrlBase(HttpServletRequest request) 
        throws MalformedURLException {
    URL requestUrl = new URL(request.getRequestURL().toString());
    String portString = 
            requestUrl.getPort() == -1 ? "" : ":" + requestUrl.getPort();
    return requestUrl.getProtocol() + 
            "://" + requestUrl.getHost() + portString + "/";
}
Posted in Java | Tagged , | 2 Comments

Work with IO Stream in Java

In java, one can divide streams into two main types:

  • Connection streams, which Java use to directly connect to the source data (File on external memory, Network stream…):
    – FileInputStream/ FileOutStream is used to read binary file
    – FileReader/FileWriter is used to work with text file
    ….
  • Filter streams, or chain streams, used to wrap these connection streams in order to give it more functionality.
    – BufferedInputStream /BufferedOutputStream used to chain binary file
    – BufferedReader/ BufferedWriter used to chain text file

And here are some examples describing the typical way to:

  • Read / Write to binary file
  • Read / Write to text file
  • Read / Write to object (when using serializable)

1. Read / Write to binary file

Read:

package com.nxhoaf.io.binary;

import java.io.BufferedInputStream;
import java.io.ByteArrayOutputStream;
import java.io.File;
import java.io.FileInputStream;

public class MyBinaryFileReader {
    public static void main(String[] args) {
        try {
            // Create the source
            File file = new File("resources/input.bin");
            // Create a "connection" stream, which connect directly to source
            FileInputStream fis = new FileInputStream(file);
            // Create a "chain" (or "filter") stream
            BufferedInputStream bis = new BufferedInputStream(fis);

            // We temporally store the whole content here
            ByteArrayOutputStream baos = new ByteArrayOutputStream();

            byte[] buffer = new byte[1024];
            int length = 0;
            while ((length = bis.read(buffer)) > 0) {
                baos.write(buffer, 0, length);
            }

            // Ok, get the whole content
            byte[] content = baos.toByteArray();
            for (byte b : content) {
                // Convert to int to apply Integer method
                // here, we use byte to store bits, so, use bit mask to convert
                // unsigned byte to int
                int i = b & 0xFF;
                System.out.print(Integer.toHexString(i) + "");

                // For more info:
                // int i = 234;
                // byte b = (byte) i;
                // System.out.println(b); // -22
                // int i2 = b & 0xFF;
                // System.out.println(i2); // 234
            }

            baos.close();
            bis.close();
        } catch (Exception e) {
            e.printStackTrace();
        }
    }
}

Writer:

package com.nxhoaf.io.binary;

import java.io.BufferedOutputStream;
import java.io.File;
import java.io.FileOutputStream;

public class MyBinaryFileWriter {
    public static void main(String[] args) {
        try {
            // Create the source
            File file = new File("resources/output.bin");
            // Create a "connection" stream, which connect directly to source
            FileOutputStream fos = new FileOutputStream(file);
            // Create a "chain" (or "filter") stream
            BufferedOutputStream bos = new BufferedOutputStream(fos);

            byte[] bytes = {
                    0x48,// H
                    0x65,// e
                    0x6C,// l
                    0x6C,// l
                    0x6F,// o
            };

            bos.write(bytes);
            bos.close();

            // As the content is in binary form (not human-readable), we cannot
            // read it, use this tool instead to check the file content
        } catch (Exception e) {
            e.printStackTrace();
        }
    }
}

2.Read / Write to text file
Read:

package com.nxhoaf.io.text;

import java.io.BufferedReader;
import java.io.File;
import java.io.FileReader;

/**
 * TextFileReader demo
 * @author nxhoaf
 *
 */
public class MyTextFileReader {
    public static void main(String[] args) {
        try {
            // Create the source
            File file = new File("resources/input-text.txt");
            // Create a "connection" stream, which connect directly to source
            FileReader fileReader = new FileReader(file);
            // Create a "chain" (or "filter") stream
            BufferedReader reader = new BufferedReader(fileReader);

            String line = "";
            while ((line = reader.readLine()) != null) {
                System.out.println(line);
            }

            reader.close();
        } catch (Exception e) {
            e.printStackTrace();
        }
    }
}

And write:

package com.nxhoaf.io.text;

import java.io.BufferedWriter;
import java.io.File;
import java.io.FileWriter;

/**
 * TextFileWriter demo
 * @author nxhoaf
 *
 */
public class MyTextFileWriter {
    public static void main(String[] args) {
        try {
            // Create the source
            File file = new File("resources/output-text.txt");
            // Create a "connection" stream, which connect directly to source
            FileWriter fileWriter = new FileWriter(file);
            // Create a "chain" (or "filter") stream
            BufferedWriter writer = new BufferedWriter(fileWriter);

            String[] lines = {"one", "two", "three"};

            for (String line : lines) {
                writer.write(line + "\n");
            }

            writer.close();
        } catch (Exception e) {
            e.printStackTrace();
        }
    }
}

3. Read / Write to object (when using serializable)
We’ll use Person.java class described below to test the read/write
Person class:

package com.nxhoaf.io.object;

import java.io.Serializable;

public class Person implements Serializable {
    private static final long serialVersionUID = 1091172054761152924L;
    private String name;
    private int age;

    public Person(String name, int age) {
        this.name = name;
        this.age = age;
    }

    public String toString() {
        String result = "";
        result += Person.class.getName() + "\n";
        result += "name: " + name + " age: " + age;
        return result;
    }
}

Read:

package com.nxhoaf.io.object;

import java.io.File;
import java.io.FileInputStream;
import java.io.ObjectInputStream;

/**
 * ObjectReader demo
 * @author nxhoaf
 *
 */
public class MyObjectReader {
    public static void main(String[] args) {
        try {
            // Create the source
            File file = new File("resources/input.obj");
            // Create a "connection" stream, which connect directly to source
            FileInputStream fis = new FileInputStream(file);
            // Create a "chain" (or "filter") stream
            ObjectInputStream oos = new ObjectInputStream(fis);

            Person p1 = (Person) oos.readObject();
            Person p2 = (Person) oos.readObject();

            System.out.println(p1);
            System.out.println(p2);

            oos.close();

        } catch (Exception ex) {
            ex.printStackTrace();
        }
    }
}

Write:

package com.nxhoaf.io.object;

import java.io.File;
import java.io.FileOutputStream;
import java.io.ObjectOutputStream;

/**
 * ObjectWriter demo
 * @author nxhoaf
 *
 */
public class MyObjectWriter {
    public static void main(String[] args) {
        try {
            // Create the source
            File file = new File("resources/output.obj");
            // Create a "connection" stream, which connect directly to source
            FileOutputStream fos = new FileOutputStream(file);
            // Create a "chain" (or "filter") stream
            ObjectOutputStream oos = new ObjectOutputStream(fos);

            Person[] persons = {
                    new Person("Peter", 11),
                    new Person("Mary", 21)
            };

            for (Person p : persons) {
                oos.writeObject(p);
            }

            oos.close();
        } catch (Exception e) {
            e.printStackTrace();
        }
    }
}
Posted in Java | Tagged | Leave a comment